How To Stack Milky Way Images In Starry Landscape Stacker
Ever wonder how to get low-noise images of the Milky Way (even with a crop-sensor camera)? One method is stacking. This tutorial will teach you how to do it on a Mac with Starry Landscape Stacker.
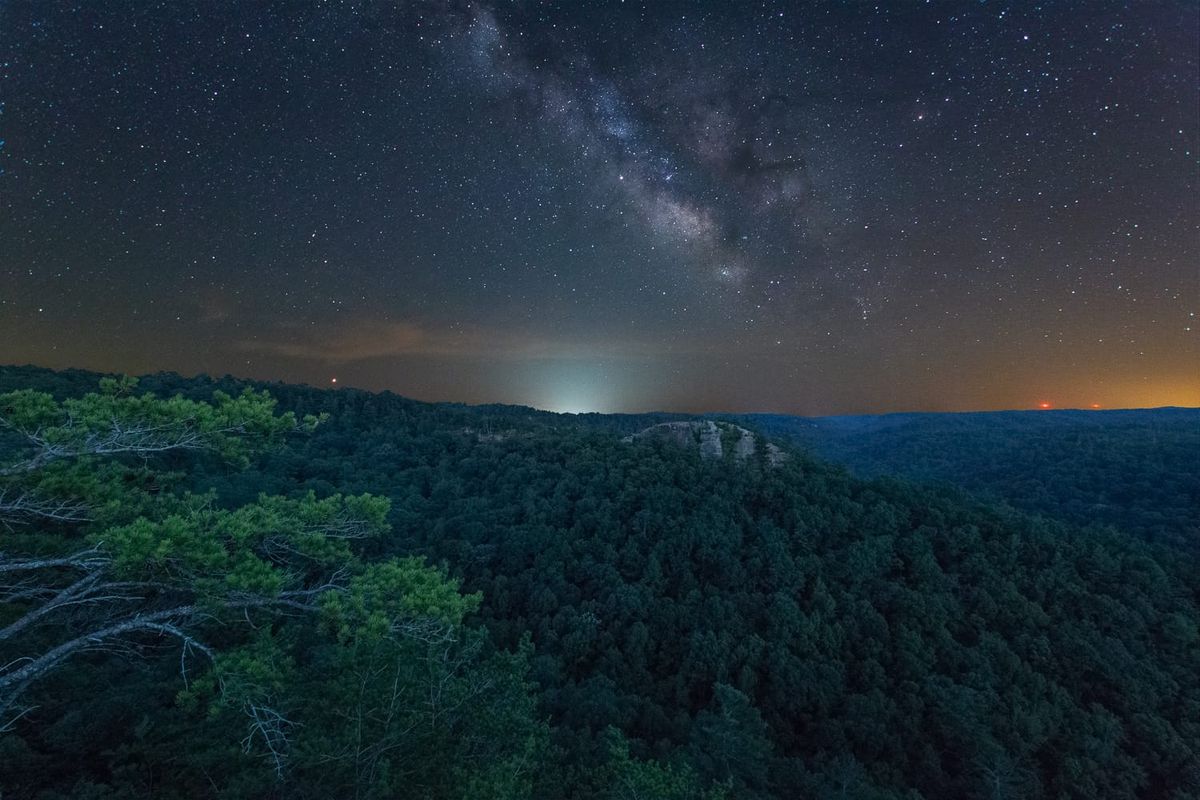
You’ve spent countless hours planning and obsessively checking the weather to go out and capture what you hope will be an epic Milky Way shot. You’ve got a great location, a killer composition, and you took the time to carefully dial in your focus and camera settings. You get them home and realize that there is just too much noise for there to be a good image. What went wrong? How do people get these epic, low-noise Milky Way shots?
Well, one option would be to use a star tracking setup, but this is expensive and complicated to learn. An alternative, however, would be to use a method called stacking. Using this method, we can shoot the Milky Way at extremely high ISOs and end up with a final image that has little to no noise.
The best part? This works regardless of whether or not you’re shooting on a low-end, crop-sensor DSLR or a multi-thousand-dollar pro body! This tutorial will teach you how to achieve this on a Mac using a program called Starry Landscape Stacker.
Why stack Milky Way images?
When we shoot the Milky Way, we, of course, need to capture as much light as is humanly possible. Two of the ways to achieve this are by shooting with our lens wide-open and using a slower shutter speed, but this will only get us so far. We inevitably have to shoot at a higher ISO, which produces quite a bit of noise in our images. Stacking our Milky Way images allows us to combine several exposures to reduce the noise and increase the detail in the final image.
How effective is stacking for Milky Way photography?
The amount of added noise that results from the high ISOs we must use to shoot the Milky Way depends on the camera. As a general rule, a full-frame DSLR is going to perform much better with high ISOs than a crop sensor camera will.
To determine how effective Milky Way stacking is, let’s consider a worst-case example. Here is an example of a Milky Way image I captured in Kentucky’s Red River Gorge. This was shot on my crop sensor Canon 70D camera at a relatively high ISO of 6400.
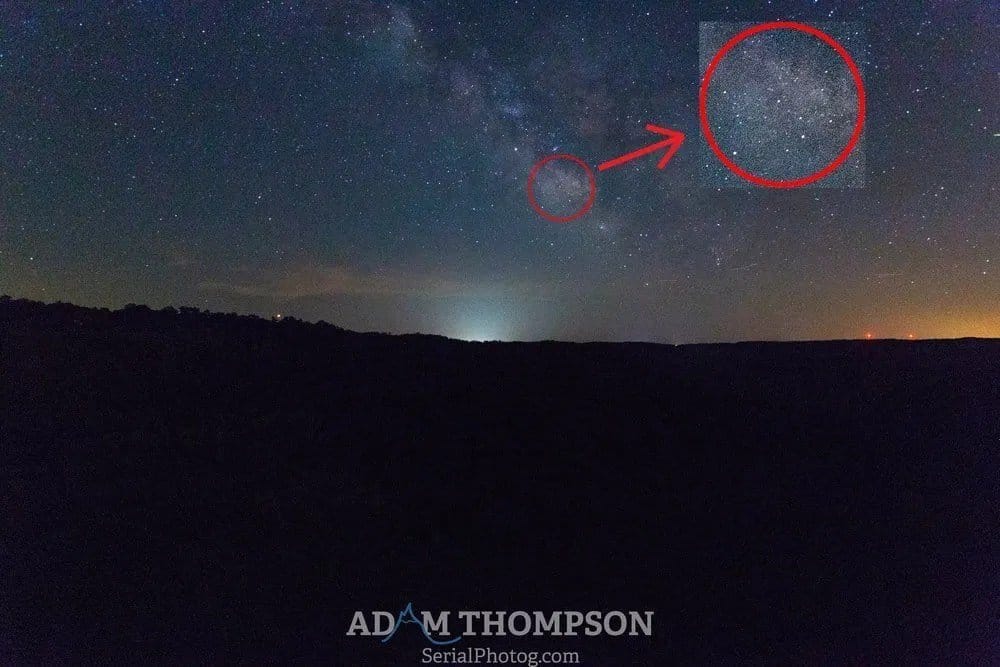
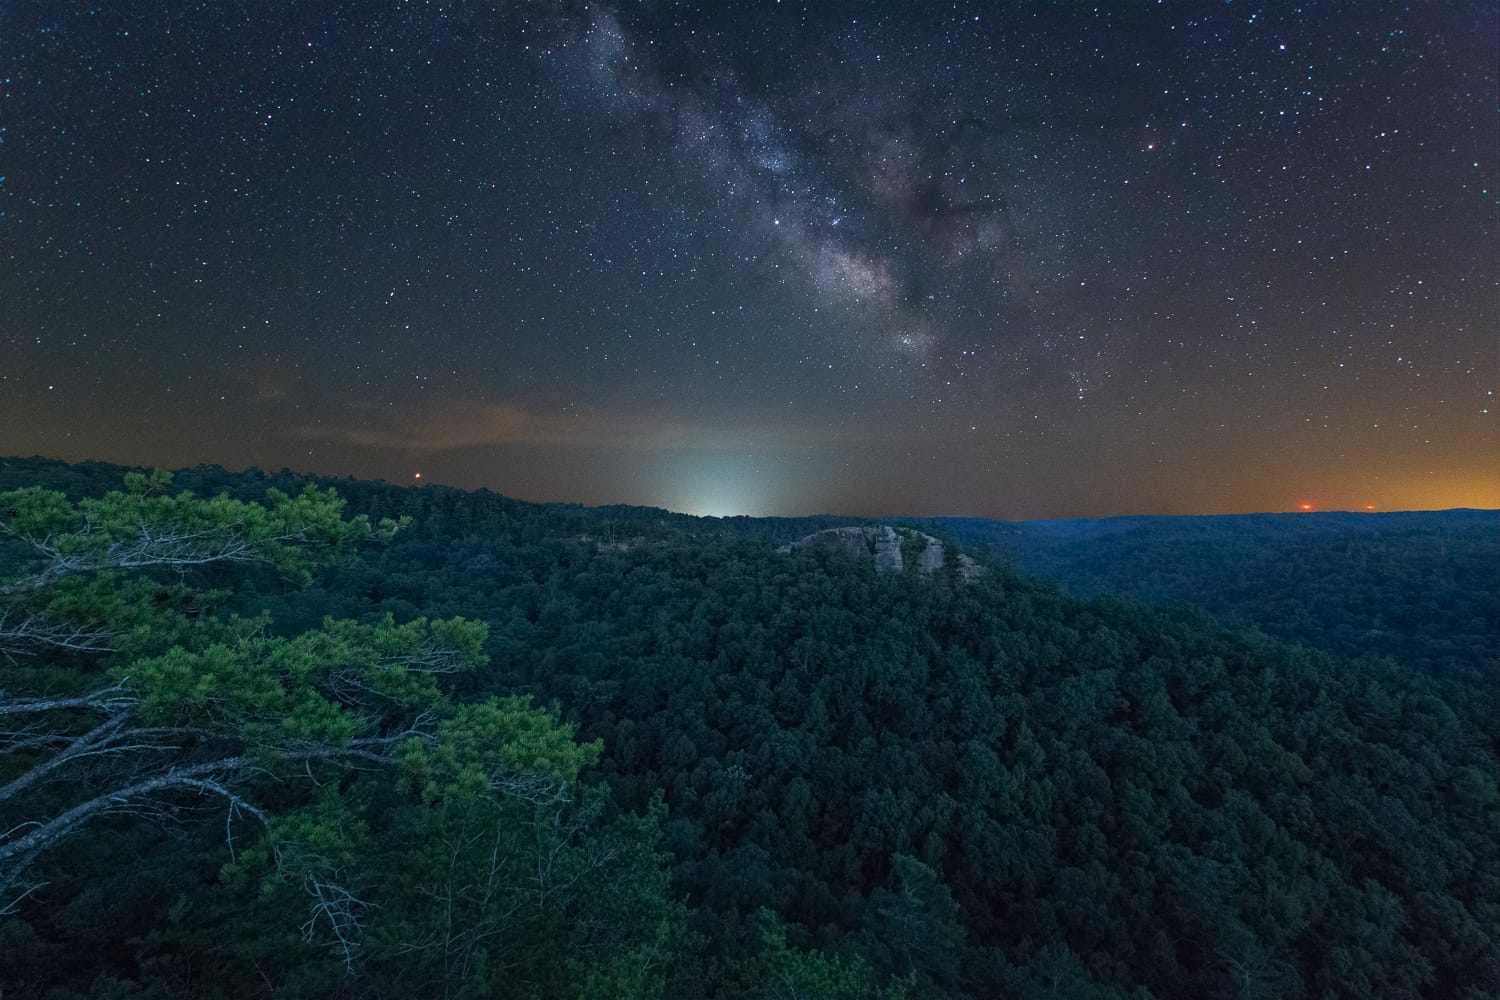
Looking at just this single frame, you might think that there’s no way you could get a usable shot with any detail, but just take a look at the final image (note, the foreground was shot hours before the sky during blue hour and blended in later).
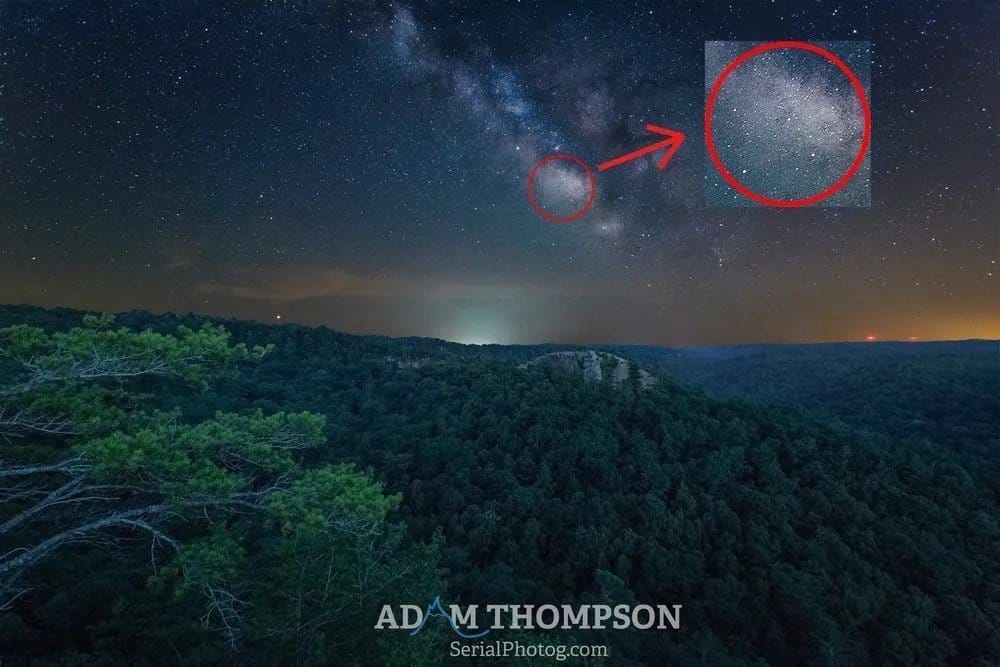
Post-processing clearly plays a huge role in the differences between these two shots, but the big thing I want you to pay attention to here is the lack of noise in the final result. This is purely from image stacking, not from any sort of other noise reduction techniques.
How stacking Milky Way images works
To stack images, we will use a special piece of software. For this tutorial, I will be using an app called Starry Landscape Stacker, which is, unfortunately, a MacOS-only app. It’s said that Sequator is a good Windows alternative to Starry Landscape Stacker, but I’m yet to get a result out of it that I’m happy with. If I ever do, I’ll write up a tutorial of how I did it.
Anyway, for stacking to work, you take multiple exposures of the sky (we’ll get to that in a moment) and load them up into the stacking software. The software will then align the separate frames and apply what’s known as a median noise reduction filter.
In doing this, the software can isolate the noise patterns and output a resulting image with greatly reduced noise. This is, of course, a gross over-simplification of how the software works, but this isn’t meant to be a computer science lecture 🙂
So, let’s quit jabbering about stacking and take a look at how to do it!
How to shoot the Milky Way for stacking
Before you can start using Starry Landscape Stacker to stack your Milky Way images, you first need to get out and shoot your exposures. You’ll largely plan your shoots the same, and the photography process is virtually the same, but there is a key difference.
The first thing you need to do is set up your camera to shoot the correct exposure of the Milky Way. This works the same as it would for any other Milky Way shoot. The big difference here is that you’re not going to take just a single exposure. Instead, you’re going to take multiple exposures of the sky. These will comprise the images that you will stack.
How many shots should I take to stack my Milky Way images?
As a general rule, the more images you have to stack, the better the final result will be.
There is a point where you will encounter diminishing returns, however. As such, I recommend shooting somewhere in the range of 10-15 images to use for stacking later.
For reference, I used 10 frames for this final result from my crop sensor camera:

How to stack Milky Way images on Mac using Starry Landscape Stacker
Now that we’ve got our images, it’s time to start the stacking process. To start things off, I import my photos into Lightroom and do a very basic edit on the first frame of the Milky Way. This is meant to be a very basic edit to fine-tune the exposure, contrast, and white balance of the Milky Way. For reference, here’s the basic edit I did for the above shot:
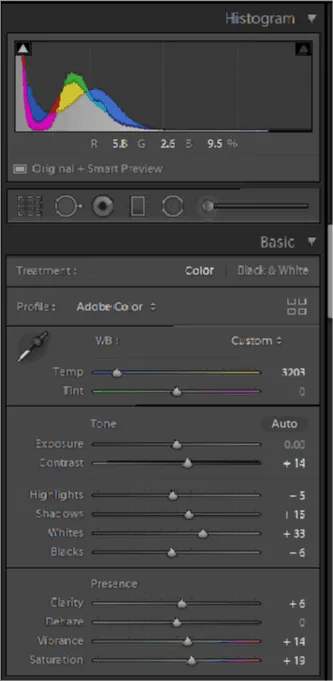
Once you get your basic edit dialed in, select all your Milky Way frames and select the ‘synchronize’ option in Lightroom to sync all the edits you just made.
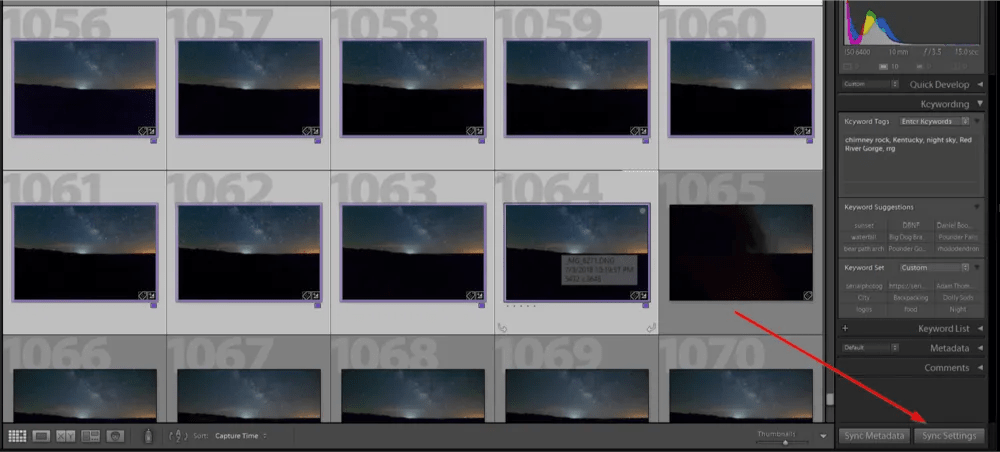
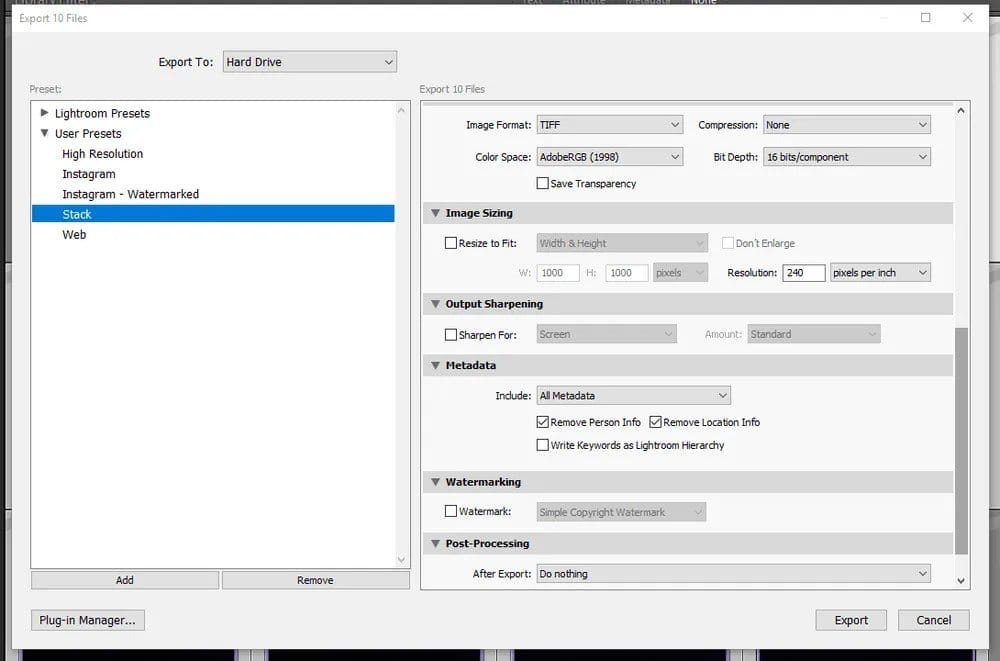
Once your settings are synced, select all your frames and export them as TIF files. The settings you want for this export are a full resolution, 16-bit TIF file. Make sure you export the images with all the metadata, since Starry Landscape Stacker uses some of this information to help it align the frames. Export them to a folder so you can easily locate them again.
Now it’s time to head into Starry Landscape Stacker and start the stacking process.
Starry Landscape Stacker
When you first open Starry Landscape Stacker, it’ll open up a dialog to open your images. Simply navigate to and select all your frames (in my case, there are 10 of them) and hit open. Note that you can select multiple files by command-clicking them.
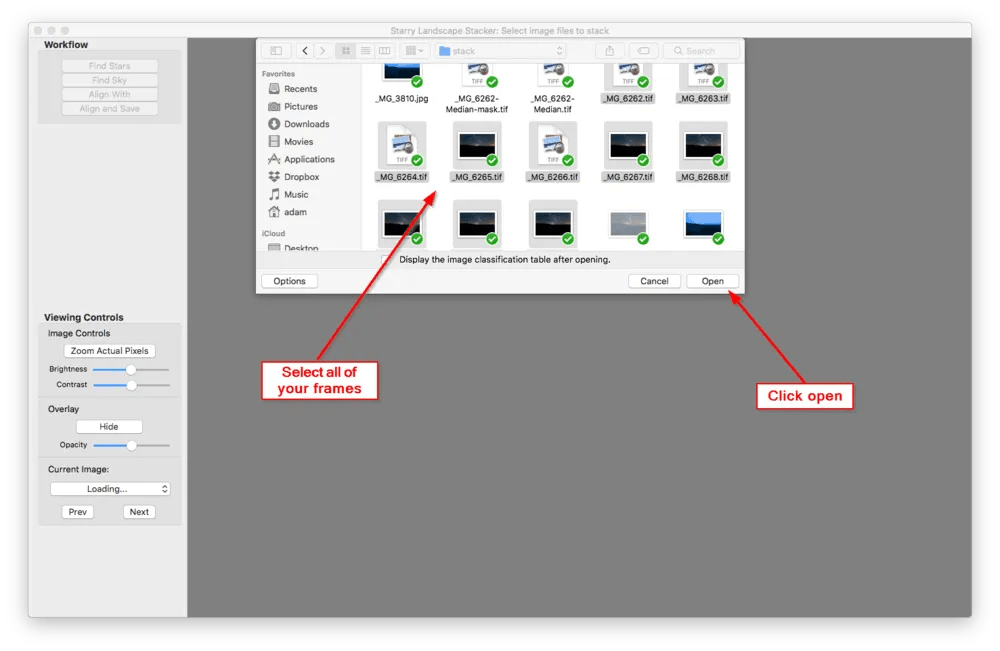
The app will then proceed to start reading your images and open them up. The view you’ll be greeted with may seem chaotic at first, but I promise you it’s quite simple.
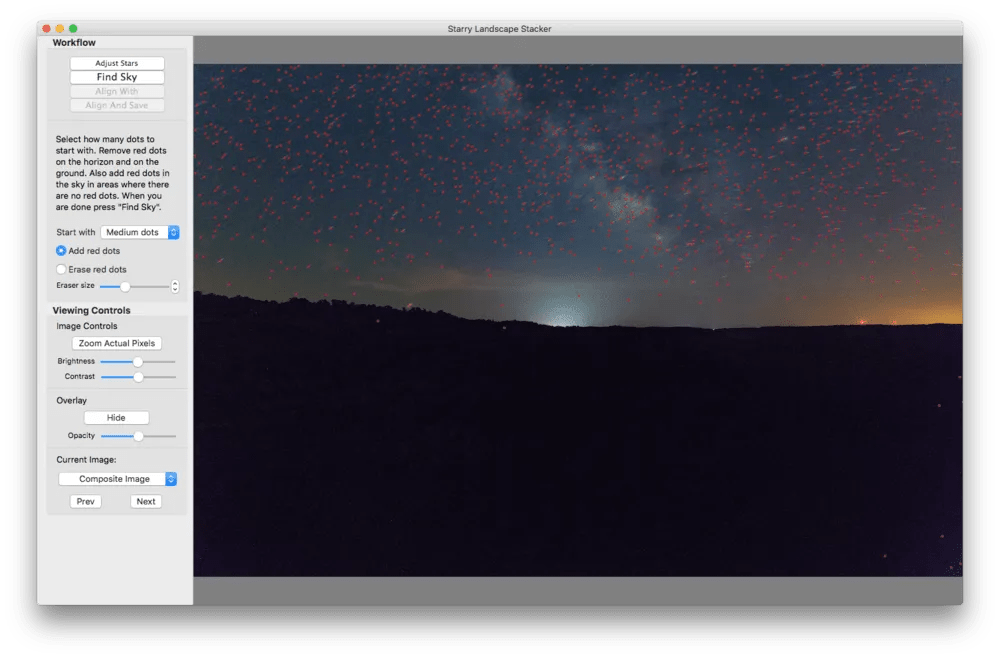
You’ll notice a couple of things about this view. Number 1, there are a bunch of red dots all over your image. These are points that Starry Landscape Stacker uses to help it align the images and detect the sky. We will be refining these momentarily.
The other thing you’ll notice is that the image it is displaying is extremely blurry. This is because it’s currently showing us an unaligned composite of our images. This will make it difficult to do what we need to do, so let’s instead use the Current Image dropdown in the lower left-hand corner to select a single frame to work with.
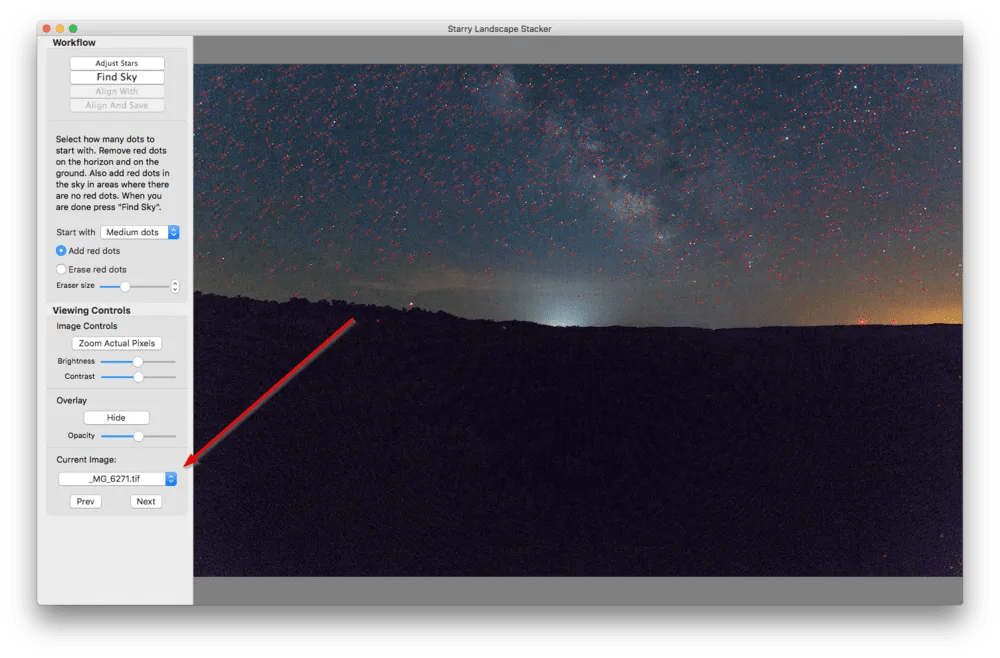
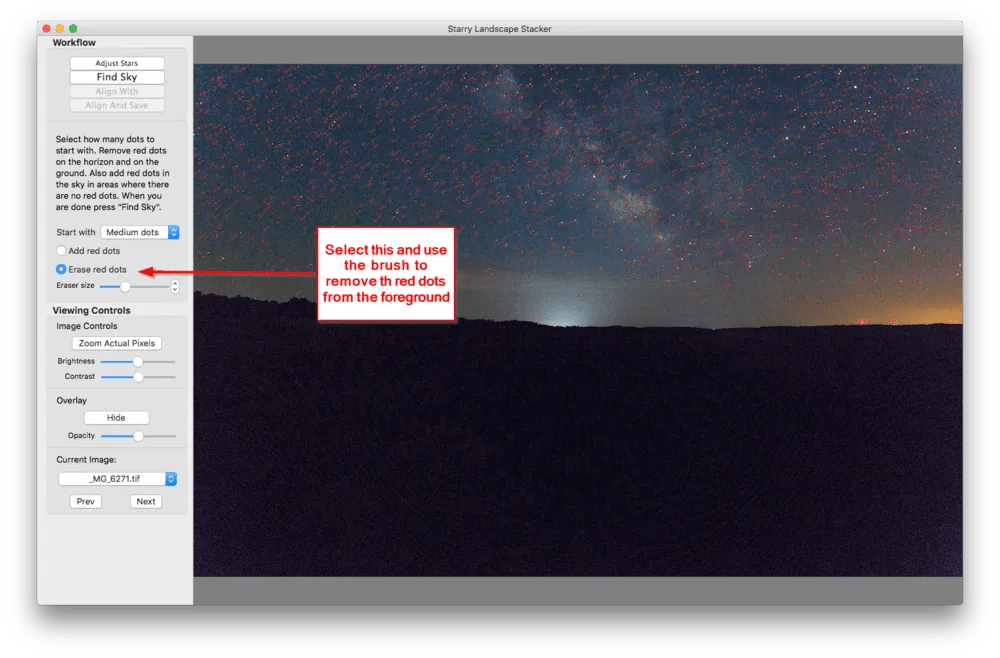
Now it’s time to refine those red dot points we mentioned before. It’s best to take some time to really refine these, since this is how Starry Landscape Stacker not only aligns the images but also how it isolates the sky.
The first thing we want to do is remove the dots that were erroneously placed on the foreground. We can do this by selecting the Erase Red Dots option to the left and simply painting over the dots that appear on the foreground. We only want these dots to be in the sky.
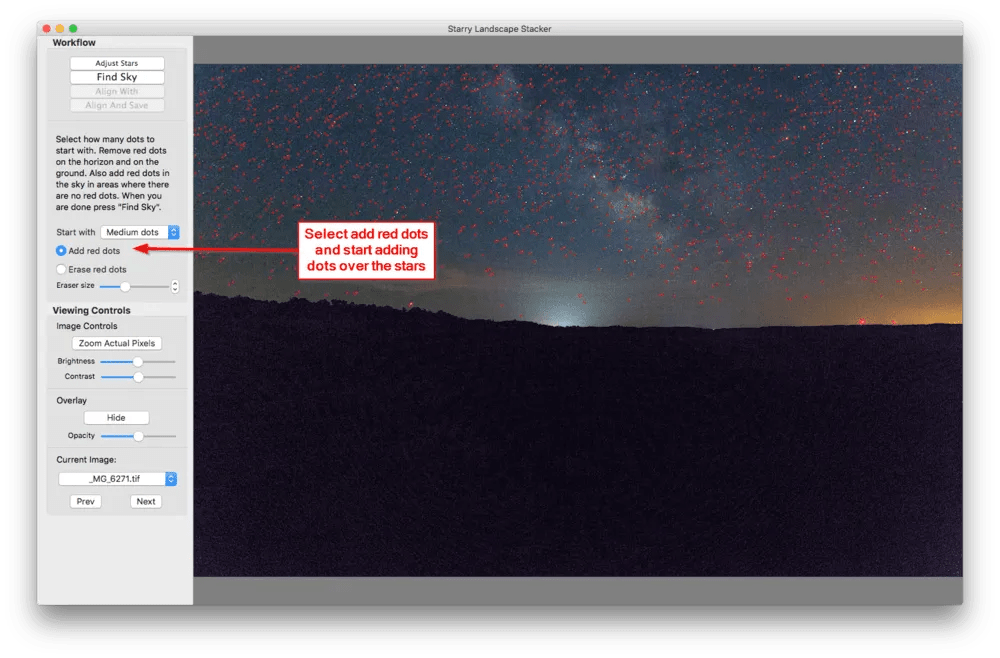
Now that we’ve removed the dots from the foreground, we want to add more to the sky. The idea is to place these dots over the stars in the sky. We certainly don’t have to do it with all the stars, but the more stars we put a dot on, the better our end result will be. Also, the more we can place along the horizon, the easier life will be in a bit. So, select the Add red dots brush and start placing red dots over those stars. Tip: You can zoom in and out in Starry Landscape Stacker by using the Z key.
Once you’re satisfied with your control points, hit the Find Sky button. This will paint a blue mask over the area that Starry Landscape Stacker thinks is your sky.
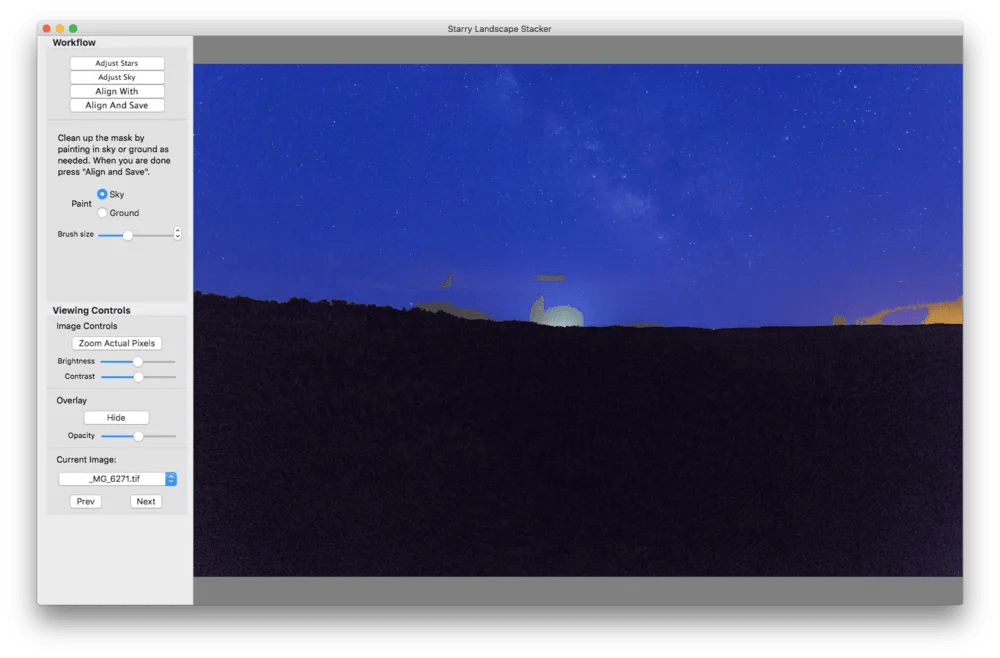
Your sky mask will almost certainly need tweaking. This can be done by using the options on the left. Choosing ground will allow you to remove portions of the mask that intersect with the foreground. The sky brush will allow you to add on to your sky mask.
Take some time to refine your mask. If you’re planning on doing a composite image as I did, getting this mask as perfect as you can here will make your life A LOT easier when it comes time to do the blending in Photoshop! As you can see, I need to refine my sky mask.
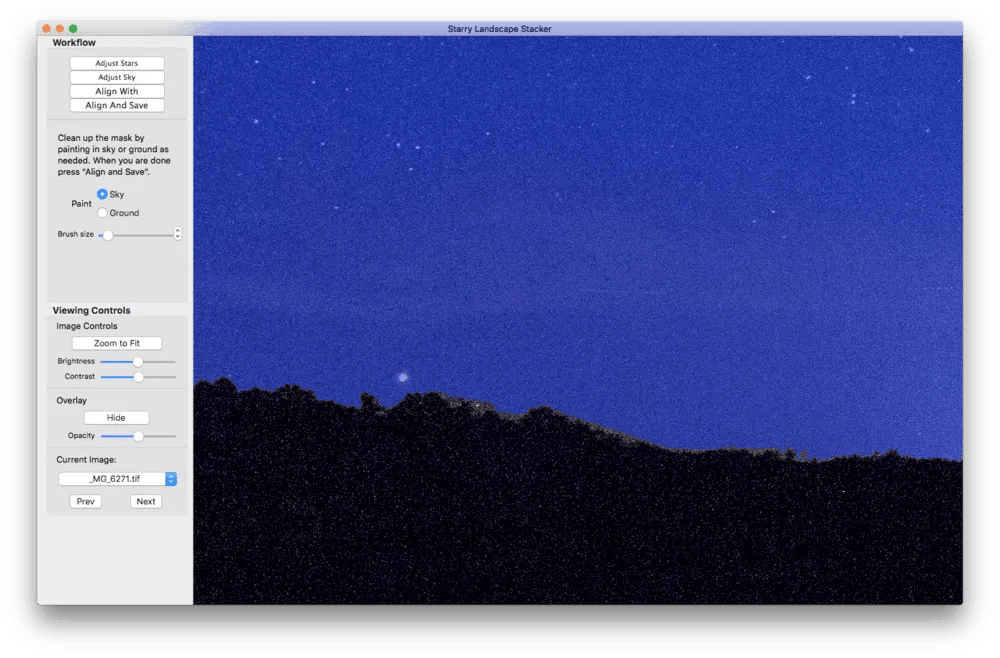
Once you’re satisfied with your mask, hit the align and save button. This will align your images and apply the median noise reduction filter. Note that depending on your computer and the number of images you’re stacking, this could take some time. You’ll end up with a preview of the resulting stack.
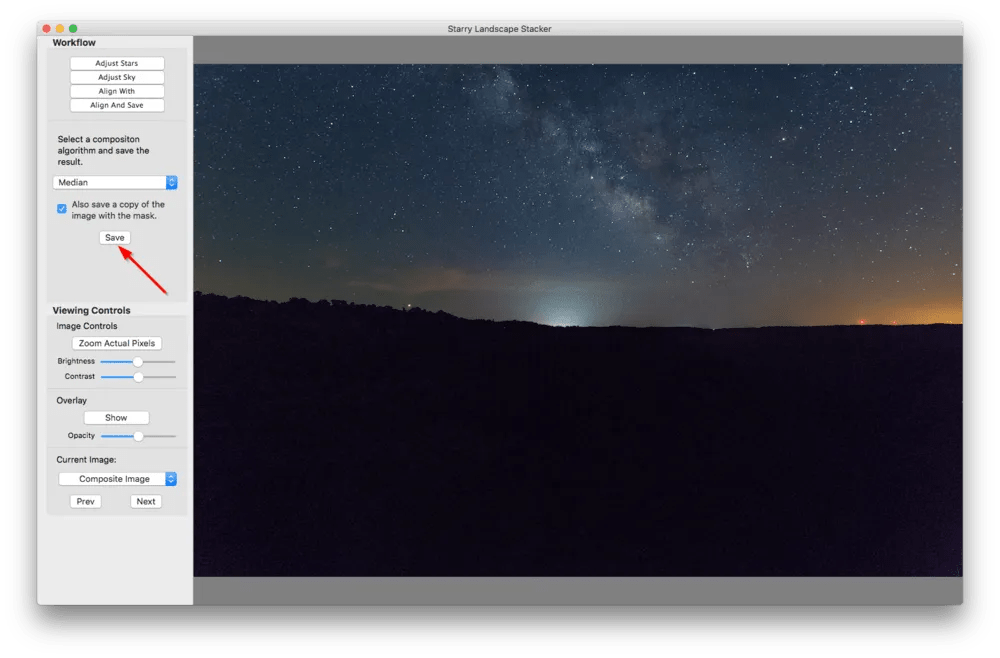
Assuming you’re happy with the results, hit the save button. This will bring up a save file dialog for both the stacked image and the masked sky. Choose where you want to save them, and you should end up with two files.
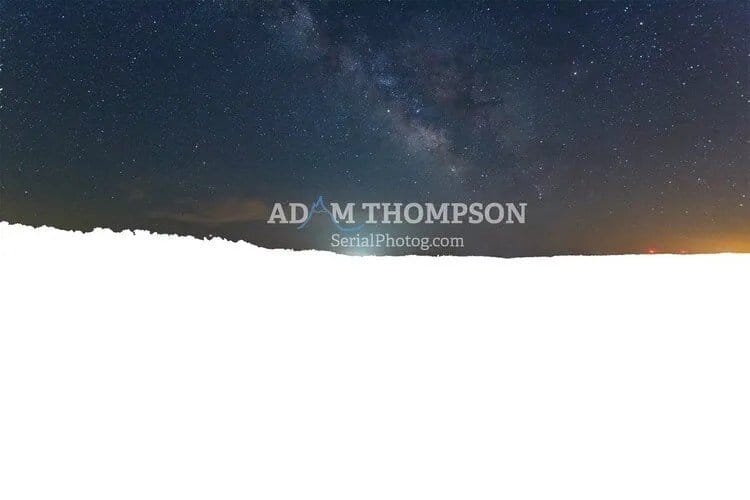
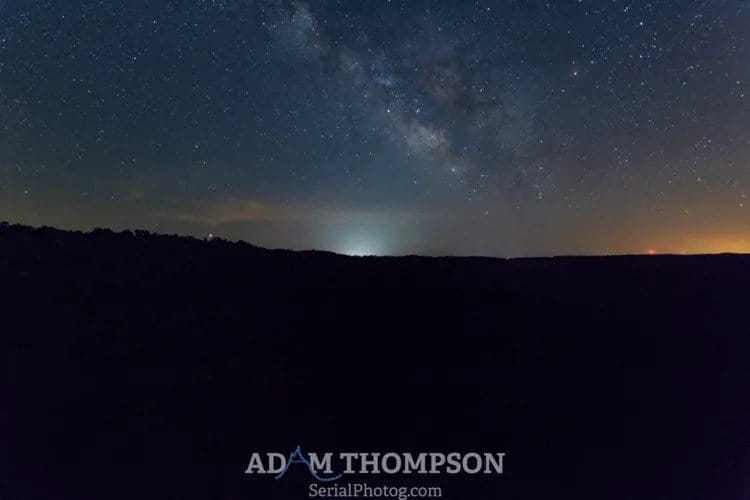
Now you can see what I was referring to with the sky mask. Notice that the masked-out sky is exactly what you might want if you were planning on blending in a separate foreground as I did. Now I think you can see why I said you’ll have significantly less work to do later if you do a good job refining your mask in Starry Landscape Stacker.
As far as the stacking is concerned, however, that’s all there is to it! What you do to finish your image from here is all up to you. Here’s the final result I ended up with after I applied all of my edits.
Found this helpful?
Did you find this guide useful? If so, I encourage you to share it for others to benefit from!


Comments ()